Ok. I didn't use my Flip video camcorder for teaching or practising english. I use it for providing practise of a language we sometimes not consider it as such : Sign language. In our country, it is not still considered officially a language. It has been recognized by law its use among the deaf community, though (Art. 80. Constitution of the Bolivarian Republic of Venezuela).
In my previous post I wrote how I ended up using the Flip Video to recorder the signs we had already learned all along the course so far. Here I will tell you how I used it, the editing process and publishing the videos.
In my previous post I wrote how I ended up using the Flip Video to recorder the signs we had already learned all along the course so far. Here I will tell you how I used it, the editing process and publishing the videos.
Just as brief reminder (in case you haven'r read my previous post) I'm currently coordinating and taking a Venezuelan Sign Language course offered by "Comisón de Apoyo al Estudiante con Discapacidad de la Escuela de Bibliotecología y Archivología" (CAEDEBA). In english, it'd be something like "Committe to Support Students with Discapacities in the School of Librairanship". This course has wonderful printed material designed by Aymara Hernández, our teacher. However, another more dynamic visual element was much needed: videos to practice during the week to remember how to make each sign. So I suggested this to Aymara and classmastes. They just loved the idea. Next step, I purchased a Flip Video and started planning how to record these videos.
Recording session
1. Aymara Hernández and I chose a day to record the videos for each lesson. A day was more than enough to do so. So we scheduled a tuesday early afternoon to make the most of the natural light to record.
2. We chose a spot in the Faculty of Humanities and Education. Walls had a nice red background (red small tiles) surrounded by a small garden.
3. We recorded all lessons from 1 to 7. Having recorded the segments this way made the editing process easier. For example, I knew the first videos were for the first lessons so if I didn't remember which sign Aymara was making for Lesson 2 I could always check the handouts and labelled the video for a sign appropriately..
4. It took about 2 hours to record all signs. I recorded about 56 videos.
Editing
A) Rotating videos recorded horizontally
 |
| This is a DON'T |
I recorded some of the langauge signs holding the camcorder horizontally. Not such a good idea. How was I going to flip the videos vertically? I didn't think about this during the recording sessions. But no panick. I decided to venture myself and search the net to see If I managed to find a software to flip the videos vertically. The first one I used was called: Free Video Clip and Rotate. It was really andy until it started to send an error message everytime I tried to flip the video. I almost fainted! I was halfway the editing process!! However, I give it another tried and kept on searching on the net and found this: X2X Free Video Flip and Rotate. Easy to use, was able to flip videos and no error messages! The only problem when rotating the videos was its quality; not as good as the ones I recorded vertically.
B) The Flip video software
1. Trimming the video was really easy. I used the Flipsahre software. I just chose the segment and trimmed by moving these two small sliders (Start and End sliders) below the main slider or Play head.
I had to trim the videos since I was isolating as much as I could each sign language. In one recorded video I coul d have up until five or six different signs.
C) Uploading the videos
Easy again, from the Flip Share program, just chose "Share" and selected Youtube and that was it. Now the one I had flipped using X2X Free Video Flip and Rotate, was uploaded as any other regular video from a PC or laptop.
D) Details I forgot

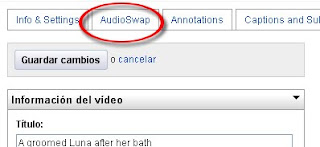
While recording I forgot to press (-) to decrease the volumen to record a free-sound video. Yes, you might be saying it is sign language, so you can'r simply lower the volumen or not use headphones. However, I didn't want to run the risk of someone listening to the distracting sounds picked up by the microphone during the recording session. Of course, I could have created a video using the Flipshare software, chose "Music File" and in "Music options" chose "Play music only, without sound in the video". But guess what, I din't. But luck struck, and I started checking if It was possible to reduce or eliminate sound in YouTube. Good news is you can. How? Click on "Edit". Next, click on "Audio Swap". Choose a song and that's it. The only disadvantage is you cannot edit the sound so it abruptly cuts off at the end of the video.
Making the videos public
I created a wiki in PBworks to make the videos available only for those who are takign this course as requested by Ayamara.
Sample videos recorded with the Flipvideo camcorder:
(In Spanish: ¿Cómo deletreas tu nombre? / How do you spell your name?)
(In Spanish: ¿Cómo te sientes? / How do you feel today? or How are you feeling?)
Educational applications in EFL / ESL:
1. Telling stories
2. Acting out situations
3. Students' pecha kuchas
4. Dictations
5. Pronunciation
6. Interviews
7
7. Describing places / people
Read more on its possible applications in ELT:
Flip your instruction with Flip Video cameras
7. Describing places / people
Read more on its possible applications in ELT:
Flip your instruction with Flip Video cameras


No comments:
Post a Comment