Monday, August 15, 2011

Screencasting & interactive videos for teacher development


Using screencasting software or services to record what you do on your computer has become, in my humble opinion, one of the most useful tools for teacher development and potentially useful for teaching and learning in the EFL-ESL classroom.

There are free services like Screenr, CamStudio, Jing, Screen-O-matic, Tildee and paid software like Camtasia to make these recordings. Screencasting can be used to:

  1. show how to use a web tool (How-to videos)
  2. give feedback to participants (eg. writing or online projects)
  3. video lectures (eg. showing how certain skill works; giving short explanations on language aspects)
  4. make presentations

Screencasting is not only a great web tool for teachers, but students can also use it to showcase a project; to describe their online portfolios; for making presentations; to describe a picture among other things.

I have been using screencasting for some teacher development courses I have participated as moderator or comoderator this year. One of them is the English Village Online. I used it as co-moderator in a podcasting course to show participants how to record and publish podcasts  and to provide feedback to them on their final projects (inspired on Russell Stunnard’s work about screencasting & feedback). Also I have used screencasting to record tutorials for The Learning Technologies for the Classroom course offered by the BritishCouncil (Venezuela) to show participants how to:

1, have access to the course in Moodle and give them a walkthrough on the course content.
2. use Wiziq as our virtual classroom
3. create a blog for participants’ reflections
4. use certain web tools introduced in the course modules.

For this course, I recorded 11 tutorials in total using Camtasia. If you are going to use a free screencasting service you have to make sure you can download or save the video to your computer and that it is in one of the format accepted by Youtube (.AVI, .3GP, .WMV, .MOV, .MP4, .MPEG, .FLV, .MKV). Making this interactive video compilation would make it easier for participants to have access to tutorials from one single place. This would keep participants from having to bookmark and watch the tutorials from separated links. 

Now how did I come up with this idea? I remembered having bookmarked this article in Diigo called How to make an interactive lesson in Youtube. And it suddenly hit me I could sort of do more or less the same thing making a video compilation instead of a lesson.

How did I create this interactive video?

I carefully read the article and watch the videos from Knewton about preparing for the GMAT. Next I had to "migrate" (so to speak) the tutorials I had uploaded from BlipTV to Youtube. Once I had done that I started planning out the video compilation. From this plan, I realized I had to record some screencasts to take participants to the tutorials in an orderly fashion. To record this videos I used my webcam, Powerpoint and Camtasia. I recorded 5 screencasts:

1. The first one called "Home" was recorded to greet and invite participants to start watching the videos by clicking on "Tutorials".
3. The second one called the "Main Menu" grouped tutorials into "Access", "Blogger" and "Modules".
  4. The last three are "submenus" for Access, Blogger and Modules. These menus provide access to the tutorials. 

Next I started adding spotlights to the menu button images. These buttons were created in Photoshop and saved as JPEG. I created some other buttons to make navigation smooth from one video to another or to go back to "Home" or "Main Menu". I created these buttons from Youtube using "Notes" in "Annotation".


To learn about adding spotlights go to How to make an interactive lesson in Youtube.

Here’s my interactive video tutorial compilation for the Learning Technologies for the Classroom course. 


Just to close this post, I recently learned from the fantastic Richard Byrne that there's a service called Viewbix for making interactive videos. Check it out and let me know what you think about it.

Tuesday, August 09, 2011

Mantweet, Womantweet

Yesterday I came accross this study on daily patterns of life in Twitter messages when reading Michael Rundell's post (You say "lovely", I say "great" - How "Beatlish" can that be). It shows according to gender how frequent a word is used. This study was carried out by the Language, Interaction an Computation Laboratory at the University of Trento, Italy.

The website Tweetolife has got a "lovely", "cute" webpage to experiment a bit with word or phrase queries and learn, for example, how frequently men say "fabulous" and when they use it or how frequently women say "dude" and when they use it as well.

To try this out, go to: Tweetolife and click on "Gender Differences" and submit a word.


You will get a graphic showing how frequent men and women use this word:


If you hover the cursor over the blue bar for men, you will read 24%. Now if you do the same over the pink bar for women, you will get 76% (mmm...blue and pink; how stereotypical that is). If you click on "Detailed Query" you will find when men and women use this word.  Apparently men use it when talking about sports  while women when talking about food!!!.


Queries are based on thousands of tweets from Twitter collected by the university of Edinburgh. This gives an interesting use to Twitter to research about vocabulary or grammar use for example. Would this king of web tools would be useful for teachers? learners? Would this be useful when writing dialogues? or any other type of writing task? Do you think it has got any application in the language classroom or it is just an interesting tool to explore about, say, gender stereotypes in class?

Friday, August 05, 2011

A writing helper: MacMillan Dictionary

Lately  I have been writing more entries for my blog and posts in the forums for courses I delivered for the British Council. As a non-native English speaker, sometimes I'm in doubt about the right word or phrase to use. Also, when I am rehearsing for my presentations or recording tutorials and doubt strikes me again, I turn to one of the best online dictionaries I have come accross: The MacMillan Online Dictionary.

What Do I like about it? First, its slick and sort of "minimalist" presentation caught my fancy. Secondly, the easy way to search words/phrases and all the info I can get including pronunciation.

Lay-out and design

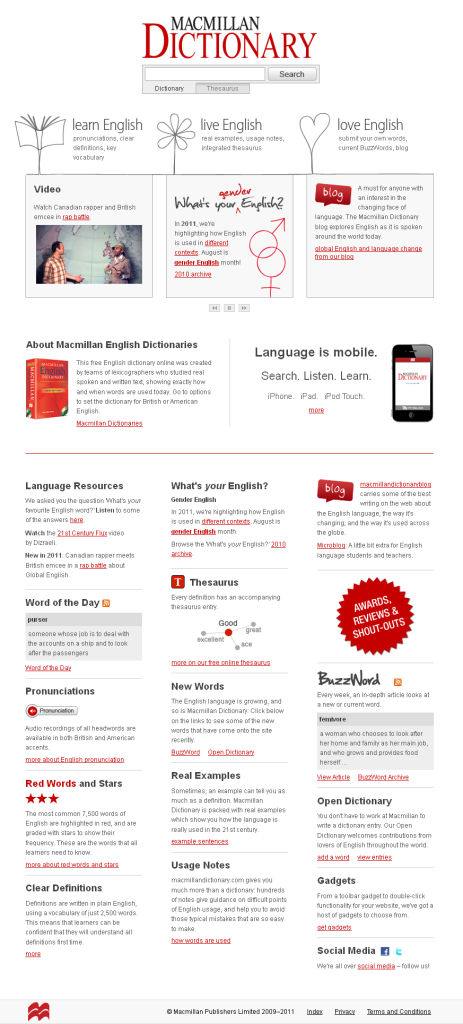
Have a peek at this image, isn't that a page you feel like you are going to get what you want? The lay-out, in my humble opinion, is clean and simple. Information is not cluttered. It goes from top to bottom. From Search engine to dictionary features/content. You can clearly identify three sections;

1. Search engine (dictionary/Thesaurus)
2. Main web page dictionary information (learn english, live english, love english)
3. MacMillan dictionaries and mobile apps.
4. In detailed-dictionary features and content for entry words

The design is as clean and simple as the lay-out. Red, black and white as the main colour for fonts, headers and drawings. Fonts are easy-to-read. Few pictures or drawings. All this makes navigation easy and pleasurable. 

What do I use this dictionary for?


1. look up word's meaning, its pronunciation, collocations and maybe prasal verbs.
2. make sure I am using the word appropriatley. You can get info about cultural notes, word stories, offensive words an metaphors.
3. check how frequent a word is. It is useful for my ESP courses at the university.
4. find synonyms in the Thesaurus.

This is really helpful when I write a blog entry or a post in forums. Also, it's really handy when I rehearse for presentations and hesitate a bit on how a certain word is pronounced.

Searching for words

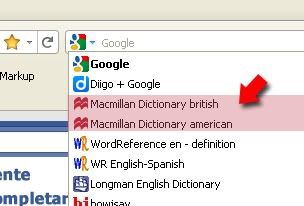
Searching is easy. You can either search in the MacMillan webpage or add it to your list in the Firefox serach bar and get definitions in a flash from its tool bar.


There are some other gadgets you can sue to search for words in a breeze in this online dictionary.

Other features I love:

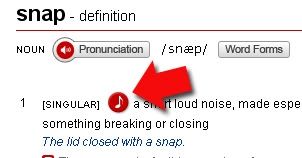
Another nice feature is that words like "snap" has got sound effect. I think it is easier to click on a sound effect icon and make our students listen to it than us trying to ackwardly impersonate the sound.


Also you can check both British or American definitions and also get some info about word forms.

It has got an interesting video like What's Your English.

How can you use it in the classroom?

1. For writing compositions, look up words and check their meaning, collocations, use, word form, phrasal verbs.
2. For reading, to look up for words and check their meanings.
3. For speaking to check pronunciation (althought chekcing pronounciation for reaidng can be useful as well).

Thursday, August 04, 2011

What a ride! The RSCON3 2011

For the second time, I participated as a presenter in an online conference thanks to the unstoppable & tireless Shelly Sánchez Terrell. As usual, Shelly DMed in Twitter and asked me if I was interested in participating in RSCON3. She suggested I could talk about the Flip videos (as I did last October in the 3rd Virtual Round Table Conference). I was a bit hesitant since, as we all know, Flip videos won't be sold anymore by Cisco. However, the always clear-sighted Shelly went something like: "Come on, Miguel, Flip videos sales will still be available for some time and besides you can always translate what you can do with them into smartphones or digital cameras)". With such powerful argument, how could I have said "No". So I started to look into the reasons why Cisco had made such dreadful and, in my opinion, unintelligent move; finding out about some other "Flip" alternatives; updating images and content from previous presentation; and trying to keep in mind the Five W´s (Graham Stanley). So a revisited version was born: "Flip cams see; smartphones and digital cameras do" (View recording here).


On the other hand, someone I met during this event and who definitely deserves all my respect is Clive Elsmore. What a way to organize the event from welcoming presenters to scheduling presentations and offering training sessions in Elluminate. My admiration also goes to the rest of the organizers: Shelly Terrell, Ina Chia, Mark Barnes, Christopher Rogers, Lisa Dabbs, Melissa Tran, Cecilia Lemos, Jerry Blumerganten and Kelly Tenkely. Amazing A-team


An icing to the cake in this event was asking presenters to record themselves giving self-intro and briefly talking about their presentations. I had fun and started to come to terms to seeing myself talking in a video and that's quite an achievement!!!!

Having a moderator in our sessions is also as important as the presenter himself/herself in online environments. He/she formally starts the session; maybe provides a few rules to follow (Netiquette); keeps reminding people about how the session goes; encourages people to participate; announces the end of the session; or just simply (which is enough) provides support by letting the presenter know he/she is not alone. I was lucky Cecilia Lemos moderated my session and to top it all off Shelly Terrell filled in for Cecilia towards the end of the session.   


Now what about the presenters? I'd like to reflect a bit on the responsabilities the presenter has got in online events like the RSCOn3 and how fulfilling these resposabilities can help organizers bring the event to successul completion. That is, I have always heard a lot about the responsabiltities of the organizers and moderators, but what about ours to help things get done smoothly, properly and on time. Here's what I think our responsabilities are:


1. reply emails from organizers in a timely manner. It is so awful when a presenter accepts to participate in an event and replies messages from organizers days (or even weeks) later. This I believe affects having on time schedules and conference website.

2. provide info about presentations as well as bios, pictures, adding oneself to guest maps, recording videos within deadlines.
3. participate in training sessions for web confererencing platform chosen for the event (Adobe Connect, Elluminate and Wiziq). Do not trust your experience as presenter! Technology can give you some quite unpleasant, unexpected surprises.

4. contact your moderator as soon as you can to let her/him know what you plan to do. 

5. keep your presentations within the time frame shown in the schedule.

6. rehearse your presentation even if you are an "experienced" presenter.

7. try not to clutter your slides with too much text! People login to listen to you not to "listen" to the slides. A good example of Powerpoint presentations, from the sessions I attended in RSCON3, are Steve Wheeler and Dave Hodgson.

8. thank  the organizers and/or the people who invited you to participate in the online event.

9. try to share your presentations using, for example, Slideshare.


Finally, one of the things I like  from online events like this one, is how comfortably you can choose what you want to see either from home or your office; from your PC/laptop or smartphone. No one notices if you have get absent for a while (grabbing a cuppa of coffee or answering the phone). And even if you miss a piece of an interesting presentation you can always watch the recording. How great is that! Can you do that with F2F presentations? very few, I think. This RSCON3 made me think a bit about the differences/similarities between online and F2F conferences. Here they are. Feel free to add more.


I have got to end this short entry by thanking Shelly for "pushing" me to participate in this kind of online events. I'd rather go unnoticed, but these opportunities may happen once in a lifetime.


Hope next time I have more time to help maybe as moderator! Kudos RSCON3 organizers! What a  ride in three fantastic days!
Related Posts Plugin for WordPress, Blogger...